|
|
|
Productos
|
|
Información
|
|
Destacado
|
|
|
 |
|
|
No hay comentarios de productos.
Remove ribbon cable harness
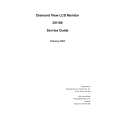
Step 1 Remove the following assemblies: � Remove the toner cartridge. See �Toner cartridge removal and replacement� on page 100. � If installed, remove tray 3. See �Remove tray 3� on page 101. � Remove the cassette from tray 2. See �Remove the cassette from tray 2� on page 101. � Remove the DIMM cover. See �Remove DIMM cover� on page 103. � Remove the rear cover. See �Remove rear cover� on page 104. � Remove the top cover. See �Remove top cover� on page 106. Step 2 Unplug the two ribbon cables (callout 1). Step 3 Feed the cables through the opening towards the harness cover. Step 4 Lift the harness cover locking tab away from the printer chassis and slide the cover away from the duplexer reverse motor. Step 5 Lift off the harness and cover.
1
Figure 105. Note
Unplug the ribbon cables When installing the ribbon cable harness (callout 1), feed the cables through the opening in the chassis.
136 Chapter 6 Removal and replacement
C7058-90936
|
|
|
> |
|